Thursday, March 28, 2013

Let's Do Brunch - Grilled Eggplant Roulades

I know some of you are planning a nice Easter Brunch for this weekend. Here's a dish you might want to consider adding to your menu. Eggplant fills in quite nicely in place of meat in this elegant rolled-up dish. It's perfect for brunch with hollandaise sauce, and would be just as nice for dinner with a marinara or vegan alfredo sauce. I served it up this time with oven roasted potatoes... mostly so we'd have another vehicle for the hollandaise.


Grilled Eggplant Roulades
makes 6 rolls - serves 2-3

1 medium eggplant, washed and cut into 1/2 inch thick slices, lengthwise
1 cup cooked quinoa
1/2 cup fresh basil, chopped
1/4 cup sun dried tomatoes, sliced
24 thin asparagus stalks
hollandaise sauce
toasted pine nuts for garnish

Make the Hollandaise Sauce first. Lightly toast the pine nuts called for in the recipe, and reserve a few for the garnish. Warm the sauce slowly while you make the roulades.


Preheat oven to 350º
Grill the eggplant slices on a grill pan or outdoor grill. When using smaller sized eggplants, there's really no need to peel or salt them before cooking. I used my heavy cast iron skillet as a weight, and the slices cooked perfectly, with nice grill marks.


Set the cooked eggplant aside, and cook the asparagus in the grill pan with a little bit of garlic powder and a light spray of olive oil if you like.


Lay a slice of eggplant on a plate or cutting board, and spread a thin layer of quinoa over it. Drizzle a little bit of hollandaise over the quinoa. Add a bit of basil, a few slices of sun dried tomato, and (4 or more) pieces of asparagus. Roll the eggplant around the fillings, so the asparagus spears peek artfully out of the sides.


Place the finished roulades in a baking pan, and place in a 350º oven for 10-15 minutes.
Transfer the hot roulades to plates, and ladle hollandaise over them. Garnish with extra basil and a few toasted pine nuts.


Monday, March 25, 2013

Easy Vegan Gluten Free Bread

One of the first things that comes up in a conversation about gluten free (GF) eating is the lack of really good bread. I've been pretty unimpressed with commercial GF breads, and many of them are not vegan. So the obvious solution - other than giving up on bread completely - is to make my own.

Gluten free baking is not exactly like "regular" baking. It takes a lot of blending of different types of flours, which might be a bit daunting at first, but the actual process is really much simpler and easier. I've been stocking up on different flours and grains, and even had to clear a shelf on my kitchen island, just for all the jars. I bought the book, Gluten Free and Vegan Bread, by Jennifer Katzinger, which I've had mixed results from. There are lots of gorgeous recipes in the book, and I'll keep exploring it, but I think I'm having some issues with altitude, since I'm baking in Taos, at an elevation of 7,000 feet. If you live at a more normal elevation, I think you'll love the book.


The recipe I'm sharing with you here originally comes from the Aprovechar blog. And while I fell madly in love with it the first time I tried it, I've been messing with it for a couple of weeks now, ever since my friend Patty sent it to me. I've streamlined it a bit, made some changes that suit our tastes better, and even kicked out the oil. What we have here is my go-to bread recipe. This bread is moist and light, but dense enough to hold together for toast or sandwiches. The flavor is just divine, and the crust is firm but not too hard.


I've tried every trick I can find to get this bread to rise to a "normal" height, but so far nothing has worked, with this recipe, or any of the others I've tried from Katzinger's book. I'm blaming the altitude, and sharing this recipe anyway because it tastes so wonderful. I've surrendered to making two little sandwiches if I'm wanting a "whole" sandwich. No problem.

Because there's no gluten to develop, GF bread doesn't require all the kneading that wheat bread does. This means that even with yeast breads, like this one, the work time is cut down significantly. In this case, it's just a matter of stirring it all up and letting it rise in the pans before baking. Count me in. I'm suddenly an avid bread baker.

Easy Vegan Gluten Free Bread
makes 2 loaves

1 1/2 cups millet flour
1/2 cup teff flour
1/2 cup corn flour
1/2 cup chickpea flour
1/2 cup brown rice flour
1 cup potato starch (potato flour is not the same)
1 cup tapioca flour
1/2 cup flax meal
1/4 cup xanthan gum (or guar gum)
1 T salt
1 T baking powder
3 packets yeast
~~~
1/4 cup maple syrup
1 T apple cider vinegar (or white vinegar)
3 1/2 cups warm water

Oil 2 bread pans.
Mix all of the dry ingredients, including the yeast, together in a large bowl.
Stir the maple syrup and vinegar into the warm water, and then stir the water into the flour mixture. Stir vigorously for about 2 minutes, to wake the yeast up.
This will be a sloppy dough, actually more like a batter, and there's no need to add more flour.
Spoon the dough into the bread pans, cover with a towel, and set in a warm place to rise for about an hour. The loaves should about double in height - even though they don't do it for me...
Bake in a preheated 350º oven for about 45 minutes, or until a toothpick poked in the center comes out clean.
If the crust starts to brown too much before the bread is ready, cover it with foil and continue baking.
Remove from pans as soon as they come out of the oven, and cool on a rack. It will slice perfectly after it's cooled off, but it tastes amazing right out of the oven. I can never resist...

Thursday, March 21, 2013

Vegan, Plant Based, or Plant Strong?

Vegan, Plant Based, and Plant Strong are all terms for more or less the same thing - someone who eats plants and not animals. But it's possible to be plant based without being really vegan, or vegan without being plant strong. Confusing, I know. But I'm going to try to help you sort all this out. The simplest explanation is this: vegan is about what we don't eat, and plant strong is about what we do eat. But let's go a little deeper than that.

Let's start with Vegan, since it's what I consider myself to be, and it encompasses the other two. A vegan is someone who eats plants, plants, and only plants. No meat, no fish, no chicken, no eggs, no dairy. Vegans do not knowingly, willingly eat animals or animal products or ingredients of any kind. That's easy to grasp after a few minutes for most people, and maybe a weird question or two like, "Well, what about chicken broth? There's no meat in it." We answer those as gently as possible, and explain that chicken broth does indeed come from chickens, so no, we don't eat that. What is negotiable in a vegan diet is the quality of the food. Some vegans eat a super healthy, whole-foods diet, while others are happy with processed vegan convenience foods, which can include a lot of junk. The mere fact that a food is technically vegan doesn't mean it's healthy.

But being vegan goes deeper than just diet. Most of us are in it for the personal health benefits, at least to some extent, but we're also interested in animal rights and the environmental (and human) impact of factory farming. There are a lot of activists in these areas, and they're doing a lot of hard work to raise awareness in the mainstream population.

Vegans see their food choices as a lifestyle, taking further steps to eliminate all animal products from their lives. Leather shoes, clothing, and furniture are easily replaced with non-animal fabrics. Cosmetics and cleaning products can be found that are not made with animal ingredients, and are not tested on animals. Even things like wine and beer are often made using animal products, although a growing number of socially conscious brands are producing wonderful vegan-friendly beverages. Cause for cheer, indeed. We all add our own little twists to the theme, but basically, someone who calls themselves a vegan is doing what they do in a big picture sort of way.

Plant Based is kind of a more generic term for vegan, but it's really all about the food. A plant based eater has a very similar diet to a vegan, but may or may not choose to get into the social issues associated with veganism. As with a vegan diet, a plant based diet may or may not be healthy, although someone who goes plant based generally does it for health reasons.

The term Plant Strong has been popularized by the Engine 2 Diet, and is on the extreme end of healthy vegan diet. A plant strong diet is a whole food plants based diet that almost completely excludes processed and packaged foods of all kinds. Those doing the plant strong thing may or may not be big-picture vegans. Some are really just trying to save their own lives, and others are interested in the same social issues that vegans are.

As you can see, there's a lot of overlap going on here, and generalizing is difficult. I hope I've helped, and not muddied the waters further. When it comes to labeling yourself, don't feel like you have to. We're all doing the best we can with what we know, and the way we see ourselves will change, and continue to change, as we do. And to most of us, no matter what we call ourselves, we're all on the same team, with similar goals. We all want to make things better, and choosing plant based foods over animal based foods will always be a winning situation for all concerned. As for me, I'm a vegan, positively.


Monday, March 18, 2013

Zucchini Linguini and Glam Sauce

Yes, I said Glam, not Clam, because this is a very glamorous sauce, and because it is not made with clams. For this recipe, use any kind of fancy mushrooms you like, or just plain old white ones if that's all you can get. I particularly like the addition of the oyster mushrooms, because they have a nice firm texture that's a little bit, well... clam-ish. And if you'd rather not make zucchini noodles, go ahead and boil up some brown rice linguini instead. Enjoy!


Zucchini Linguini and Glam Sauce
vegan, gluten free, oil free
serves 2-4

1 cup raw cashews, soaked 30 minutes or more
1/4 cup nutritional yeast
1 1/2 cups almond milk
8 oz crimini mushrooms, cut into half inch pieces
4 oz fresh oyster mushrooms, cut into half inch pieces
1 oz dry shitake mushrooms, soaked 30 minutes in water, cut into half inch pieces
3 large cloves garlic, chopped
1/4 cup white wine
1/2 cup sun-dried tomatoes, chopped
1 cup fancy olives of your choice, coarsely chopped (I picked an assortment from the olive bar)
1 cup chopped fresh basil
1/2 lemon, juiced
salt and black pepper to taste
2 large zucchini


Drain and rinse the soaked cashews, and place them in a blender or food processor with the nutritional yeast and milk. Blend until very smooth.
Saute the mushrooms and garlic in the wine for about 5 minutes, over medium-high heat, until they start to dry out. Do not add extra liquid.
Remove mushrooms from heat for a few minutes.

Make your zucchini noodles using a spiralizer, mandoline, or vegetable peeler. This should not be done too far ahead, because the noodles will quickly start to "wilt" as they lose water.
Steam the noodles for 1-2 minutes, just to heat them up. (I place them in a large wire strainer, set in the top of a big covered soup pot with about an inch of boiling water in the bottom. See the noodles and steaming method here.)

You can order this dandy spiralizer on Amazon for about $30.
While the noodles steam, place the mushrooms back on the stove, over medium heat, and pour in the cashew sauce.
Add sun-dried tomatoes, olives, and basil, and cook for about 5 minutes, stirring often, and adding more milk, wine, or water if it gets too thick. (This should be a fairly thick sauce though, because it tends to thin a bit when poured over the zucchini noodles.)

Season the sauce with salt and pepper to taste, and squeeze in the lemon juice just before serving.
Place steamed noodles in a shallow bowl, and spoon the sauce over the top. Garnish with a sprig of fresh basil, and maybe a little sprinkle of nutritional yeast and fresh ground black pepper.

~~~

Like this? Then please click Like and Share it with your Social Peeps below, and hey - leave a comment! Let me know I'm not talking to myself here.


Thursday, March 14, 2013

Revenge of the Veggie Benny

We've been on a hollandaise binge around here lately. After trying it on asparagus and rice, the next logical step was a Veggie Benny. We used to order this at a favorite breakfast spot in Seattle, but it was only vegetarian, not vegan, and had regular hollandaise on it. Once I went vegan, I thought I'd never enjoy my beloved Veggie Benny again. Happily I was wrong, wrong, wrong. I was so excited to make this, I forgot to make potatoes to go with. We never missed them. But next time I'll bake up a batch of spuds just so we have something else to dunk in the sauce.


Veggie Benny

Vegan Hollandaise Sauce (the recipe makes enough for 2-4 people, depending on how much you love hollandaise)
English muffins - (we like Food For Life's brown rice, gluten free variety)
portobello mushrooms - one for each person
fresh spinach - about 1-2 cups
10 sun dried tomatoes, soaked in hot water for about 30 minutes, and sliced (or the kind on a jar with oil)
Earth Balance buttery spread - optional
sweet smoked paprika - optional

Make the sauce first, and warm it slowly in a saucepan while you prepare the rest.
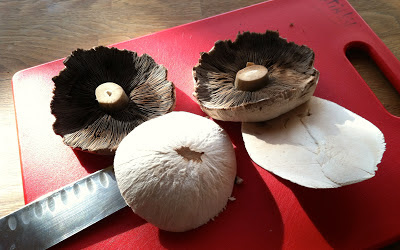
Peel the dark skin off the mushrooms with your fingers (or not - it just makes them prettier), trim the stems, and slice the mushrooms in half sideways, so you have two large rounds from each.


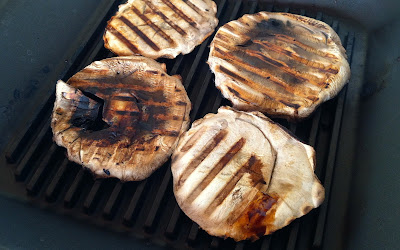
Grill the mushroom slices on both sides, in a grill pan if you have one, on an outdoor grill, or in a frying pan.


Place a mound of spinach on each mushroom slice, and top with some strips of sun dried tomato. Sprinkle on a bit of smoked paprika. Turn off the heat, and cover to steam the spinach for a few minutes.


While the spinach steams, toast the English muffins, and butter them with Earth Balance spread if you like. Layer the mushroom stacks on top of the muffins, and pour on the warmed hollandaise. Garnish with a little more paprika if you have it. And of course, mimosas are the suggested beverage to go with this!

~~~

Like this? Then please click Like and share it with your Social Peeps below, and hey - leave a comment! Let me know I'm not talking to myself!

Monday, March 11, 2013

Mu Shu Veggies with Perfect Little Pancakes and Hoisin Sauce

I can't believe how good this is. No really. Like I just want to eat this same meal over and over, every day. I actually did make it two nights in a row, just to be sure I wasn't mouth-halucinating when we ate it the first time, and no, I wasn't. This is officially one of my favorite things to eat, ever.

You have to make all three parts of this dish, but they're all simple to put together, and much of it can be done ahead of time. Make the sauce early in the day, or the day before, and just let it wait in the fridge until show time. Mix up the dry ingredients for the pancakes, and set them aside until it's time to cook them. Then all you have to do is add the water and vinegar and stir it up. And veggies can all be prepped any old time, and kept chilled until you break out the skillet.

This recipe makes enough for dinner for 3 or 4. You'll get about 24 small (1/8 cup) pancakes, almost 3/4 cup of sauce, and as many veggies as you choose to cook. This dish is vegan (of course), gluten free, and oil-free. Yes, there is fat in the nut butters used in the sauce, but we need some fat, and it's best to get it from whole foods, rather than extracted oils, which are pure fat with very little nutritional value.


Hoisin Sauce
2 T peanut butter
2 T sesame tahini
1/4 cup low sodium tamari
1 T molasses
1 T maple syrup
1 T apple cider vinegar
1/2 tsp garlic powder
1/2 tsp red pepper flakes or hot sauce

Whisk all ingredients together and store in a jar in the refrigerator. The sauce will thicken a little when it's chilled.

You can buy hoisin sauce, but this is easy to make, and really, really tasty.

Mandarin Pancakes
1 cup brown rice flour
1/2 cup tapioca flour
1/4 cup millet flour
1/4 cup flax meal
1 T baking powder
1 T vinegar
2-2 1/2 cups water

Stir dry ingredients together in a bowl. Add the vinegar, and stir in the water gradually until you have a very thin batter. Let the batter rest for about 5 minutes, then add more water as necessary. You want thin, fast-cooking pancakes.

A non-stick griddle makes fast work of these, but you can use a non-stick pan if that's what you have. Heat the griddle to 400º, or the pan to medium-high. If you have a good smooth non-stick surface, there's no need for oil. If you have some sticking, use your Misto for a very light coating of oil on the pan.

Use a measuring cup to pour about 1/8 cup for each pancake. They will sizzle and bubble instantly. Flip them when they look dry on top. It only takes about 1 minute. Cook the other side for 20-30 seconds. The pancakes will only brown a little bit, and they'll be nice and soft and flexible.

Layer them  in a spiral, rather than piled directly on top of each other, inside a folded dish towel, and keep them warm in a barely heated oven while you cook the veggies.

If you stack the pancakes like this, they'll stick together a little bit.
(But see how nice and flexible they are?)
 It's better to arrange them in a spiral, overlapping about half of each pancake.
Cover them with a towel to keep them warm and moist.

Mu Shu Veggies
4 cups sliced crimini mushrooms
2 carrots, sliced
3 green onions, sliced
2 cloves garlic, chopped
1 inch fresh ginger root, minced or grated
4 cups thinly sliced napa cabbage
1 cup bean sprouts
1 T tamari

This is really just a simple steam-fry. The flavor in this dish comes from the hoisin sauce. The mushrooms are the super-star ingredient here, giving the dish body and a wonderful richness. Use any kind of mushrooms you like, and throw in some fancy ones if you can get them.

Pre-heat the skillet or wok to medium-high. Throw in the mushrooms, carrots, onions, garlic, and ginger, and cook stirring constantly for 4-5 minutes. You can add a tiny bit of water if the veggies start to stick, but it shouldn't be necessary since there's so much water in the mushrooms. (Alternately, you can cook them in very hot oil if you prefer.) If the mixture is very wet, cook most of the water off before adding the cabbage and sprouts.

Add the cabbage, bean sprouts, and tamari, and continue to cook for about 1 minute.

You'll get a lot of steam because these are very wet vegetables.
If you need to pour some water off at the end, that's okay.
To serve, make little tacos with the pancakes, veggies, and a spoonful of sauce, and prepare to stuff yourself.

~~~

Like this? Then please click Like and share it with your Social Peeps below, and hey - leave a comment! Let me know I'm not talking to myself here (which I actually do quite a lot...)


Thursday, March 7, 2013

Easy Rice Ravioli


The secret to this simple recipe is the rice wrappers, which I use rather than pasta. These are the thin, dry wrappers you can usually find in the Asian section of your market. Different from egg roll wrappers, which need to be refrigerated, rice wrappers need to be soaked before using them, and can be eaten raw or cooked once they're stuffed. And because they're made from rice, they're gluten free.

Rick and his sister, Vicki, made these the other day, while I coached, and they had no trouble at all.

Easy Rice Ravioli
makes about 2 dozen large ravioli

rice wrappers (also called rice papers and spring roll wrappers)
store bought or homemade tomato pasta sauce, warmed

filling:
1 onion, chopped fine
2-3 cloves garlic, chopped fine
1 block extra firm tofu, pressed and crumbled
2 tsp dry basil
1 tsp dry oregano
1 tsp dry thyme
2 T tamari, or to taste
¼ cup nutritional yeast
4 cups fresh spinach, chopped
½ cup or more Cashew Cheese or Daiya - optional


Saute the onions and garlic in a little bit of water over medium heat.
Add the crumbled tofu and herbs, and stir for 2-3 minutes.
Stir in the tamari, nutritional yeast, and herbs.
Add the spinach a little at a time, and let it wilt into the mixture.
Remove from heat.
If using Daiya, stir it into the spinach mixture.

to fill:
Set out two cutting boards or large plates, or you might want to cover a larger surface with waxed paper to lay the filled ravioli on before cooking.
Fill a baking dish (or other shallow dish large enough to hold the rice wrappers) with very hot tap water.
One at a time, soak the rice wrappers in the hot water for about 20-30 seconds, until they’re soft and flexible, but not mushy. They should still have a slight “crinkle” to them.
Lay the wet wrapper on a cutting board.
If using Cashew Cheese, place a small dollop in the center of the wrapper.
Spoon 2-3 tablespoons of filling into the center of the wrapper.
Fold the side of the wrapper closest to you over the filling, followed by the side opposite you.
Fold one of the ends over the center.
Flip the ravioli over, and fold the other end over the other side of the ravioli, so that both sides have several layers of wrapper covering the filling.
Place the finished ravioli, uncovered, on a cutting board, plate, or waxed paper.
They will begin to dry out, which is good, as it toughens up the wrappers and makes them easier to handle. After a few minutes, flip them over so both sides will firm up a bit.


to cook:
Fill a large pot with water and bring it to a boil.
Place only a few ravioli at a time into the boiling water - only as many as will float together on the surface without overlapping.
Boil for one minute. They should puff up just a little bit at about the one minute mark.
Remove from the pot with a slotted spoon or small mesh strainer, and place on a plate, without overlapping.

to serve:
Ladle a small amount of warmed sauce onto plates, or into wide, shallow bowls.
Carefully arrange several ravioli onto the sauce.
Spoon more sauce over the top.
Sprinkle with nutritional yeast or store-bought vegan parmesan.


Variations: Add mushrooms, whole grains, fresh herbs, sun-dried tomatoes, pine nuts, or vegan sausage to the filling. Use kale instead of spinach. Leave out the tofu if you prefer not to eat soy. Try vegan pesto or alfredo sauce instead of the tomato-based sauce. And for a really decadent treat or appetizer, these are awfully good fried - but you didn’t hear it from me.

~~~

Like this? Then please click Like and share it with your Social Peeps below, and hey - leave a comment! Let me know I'm not talking to myself here (which I actually do quite a lot...)

Monday, March 4, 2013

Super Simple Oil-Free Kung Pao Veggies

I've already done two versions of Kung Pao on this blog (Kung Powerful Tempeh, and Everyday Kung Pao), but I wanted one that was super fast and easy to make, and that had no oil in it. I had this on the table in no time the other night, because I already had some cooked rice to throw in. You could substitute quinoa if you don't want to take the time to cook rice, or make the dish without the grain. The veggies and sauce alone are really satisfying.


Super Simple Oil-Free Kung Pao

If you need to cook grains for this, start with 1 cup dry brown rice or quinoa, and get the cooking going first, while you make the sauce and chop the vegetables.

Sauce:
1 T arrowroot
1/2 cup water

1 T fresh grated ginger
1 T fresh minced garlic
1/4 cup toasted sesame tahini

3 T tamari - or to taste (use the low sodium kind if you can get it)
3 T maple syrup
1 T umeboshi plum paste
1 T Sriracha sauce
1 T white vinegar

Place the arrowroot in a medium sized bowl, and slowly whisk in the water until well blended, with no lumps. Add remaining ingredients and whisk until blended. Set aside.

Veggies:
1/2 yellow onion, chopped
2 carrots, chopped
1/2 cup raw cashews or peanuts, chopped
1/2 tsp red pepper flakes
2 cups cooked rice or quinoa
1 bunch broccoli, cut into small florets

Saute onion in a little water, over medium-high heat, for 2-3 minutes.
Add carrots, nuts, pepper flakes, and rice, and cook for 2-3 minutes more, adding a little more water if the rice sticks.
Add broccoli, and cook for 1-2 minutes, just until it turns bright green.
Pour the sauce over the veggies, but do not stir it in yet.
Quickly cover the pan, turn off the heat, and leave it to steam for 5-10 minutes.
Stir before serving.
Top with more nuts, hot sauce, or red pepper flakes for extra heat.