Monday, December 29, 2014

Hot Product - Extra Super Vega One Chocolate Chia Seed Pudding


Do you know about Vega One? I got acquainted with it when I was training for a half marathon a couple of years ago. It's an awesome vegan nutritional shake that's a deliciously quick meal-on-the-run... even if you're not athletically inclined. It's perfect on its own, but of course anything can be dressed up a bit.

The nice folks at Vega sent me some samples to play with, and asked for any recipes I might come up with. I started simple, by adding the Vega One powder to my already-very-good chocolate chia seed pudding. The result is a nutritionally-amplified pudding that's more of a real food than a dessert. It's rich and chocolaty, with a texture resembling tapioca. It has no refined sugar - only stevia (in the Vega One) and dates, plus the rich sweetness of a banana. 


Eat this for dessert, or even for breakfast. Give it to your kids, or to elders who need may not feed themselves healthfully all the time. As far as I've experimented, everybody likes this pudding. Enjoy!


Extra Super Vega One Chocolate Chia Seed Pudding

1/2 cup raw cashews
6 pitted dates
2 cups water
1 packet (or one scoop) Vega One powder - I used French Vanilla
1 banana
1/4 cup unsweetened cocoa powder
1/2 cup chia seeds


Place the cashews, dates and water in a blender and let them soak for about 15 minutes.
Add the banana, cocoa powder, and Vega One, and blend on high speed until smooth.
Pour the mixture into a large bowl and stir in the chia seeds.
Wait 10 minutes and stir again.
Refrigerate for several hours. It will thicken as it cools.


Monday, December 22, 2014

Hot Product - Curry Love

I was at Whole Foods the other day, and came across a nice man offering samples of curry sauce over rice. Is it vegan? I always ask. And happily, one of the two sauces he was offering was indeed plant based. I fell in love at first bite, and bought a jar of Curry Love's Red Thai Curry, along with a head of cauliflower and some frozen peas. Dinner was taking shape.


I love an easy meal this time of year–ok, any time of year, really. I have become a city girl and a shortcut cook. It's great when a little old jar of sauce can save me from having to shop for and lug home all the ingredients to make said sauce, and then doing the actual making and cleaning up. I know many of you feel the same way!

This meal was a snap. All I did was cook some rice "pasta style" (see below), throwing in the veggies for the last 5 minutes or so. While the rice was cooking I warmed up the sauce in a small pan. Serving was simply scooping the rice-and-veggies in bowls and pouring the sauce over it. A few chopped peanuts sprinkled on top made it kind of fancy and added a happy crunch.


This was a terrific, versatile meal that we'll certainly repeat. The sauce is flavorful and quite spicy, which we like a lot. Consider adding all sorts of other vegetables, and maybe even some tofu. It would be great on noodles too. With a sauce this good, there's really no need to get all carried away with what you pour it over. Keep it simple, and keep a jar of this stuff in your pantry for those nights when you just don't have time for a big production.

 ~ If you aren't familiar with cooking rice like pasta, it's really simple. The reason to do it this way is to remove as much arsenic as possible, and from what I've read, it's really effective. We love rice, and we don't want to give it up, so here's the solution. Rinse your rice really well. Better yet, soak it for several hours. And best of all, take a couple of days to soak and then sprout it. I know that's asking a lot. When it's time to cook it, just put it in a big pot, covered with lots of water. Bring it to a boil, cover it, reduce the heat to low, and let it cook for 20 minutes. Test it for doneness and cook a few more minutes if necessary. Then drain, rinse with hot water, shake out as much water as you can, and put it back in the pot. Cover it, turn the heat off, and let it sit for about 5 minutes. This fluffs the rice by drying out any excess moisture.  ~

I look forward to trying more sauces from Curry Love. All of the curries are vegan,  and the yellow and green are less spicy than the red. The company's other sauces are only vegetarian, so be sure to check the labels before you buy. Do check them out though. I think you'll be pleased!


Thursday, December 18, 2014

TBT - Miso Happy Soup

There's a lot of good stuff in this blog that you might not bump into unless you've either been here since the beginning, or are going along reading the whole thing from front to back, or back to front. I'm making use of Throw Back Thursday to re-share some of my own personal favorite posts, in no particular order. Hope you enjoy the time-travel.


It's cold and drippy in Portland - which is just what we expect this time of year - and Rick is warding off a bit of a cold. It's a perfect day for soup. More specifically, our favorite remedy for the sniffles, Miso Happy Soup. Today I'll make it with some noodles tossed in instead of rice. It's a really versatile soup, and easy to throw together in a hurry. 

Here's the link to the original post and recipe. Cheers to staying healthy for the Holidays!


I'm Back

I've been gone for a while. Other things to do. You know how it is. Plus I felt like PV needed to be re-defined since my move to Portland and my radical downsizing to a micro kitchen that is frankly, pretty inadequate. 

Poor me? No way! In fact, my dinky kitchen has inspired me to simplify my cooking, which makes for easier, quicker-to-make recipes I can share with you. Re-focusing the blog, and the website too for that matter, it's now all, and only, about the good things that come with being vegan. Not just recipes, but also products, gadgets, people, events, and other things that make my vegan heart sing.

There are plenty of sources out there to give you information on why you should become vegan and how you might go about it. I'm no longer interested in recruiting - much to the relief of my friends, I suppose! Yes, of course I'd love for the whole world to go vegan, but the only one I'm really responsible for is me. You get to do what you want. And if I can help you figure out how to do what I'm doing, I'm pleased as punch to do it!

Thanks for hanging around.
Where will we go from here?
I have a few ideas...


Monday, August 25, 2014

The HappyCow Road Trip Stops in Portland


Everybody knows about HappyCow, right? But did you know they've just come out with a cookbook filled with fabulous recipes from restaurants featured and reviewed on the website? It's true! And you're invited along on the HappyCow Road Trip, where each stop takes you to a different blogger's kitchen to sample something wonderful from the book. Check out the Road Trip on their Facebook page.

Today we're at my place in Portland, Oregon, where I'm making Crostini Italiano from Veggie Grill in Hollywood, CA. We're so lucky to have our very own Veggie Grill here in Portland, just a short walk from our apartment. I'm very familiar with their food and can personally recommend everything I've tried on the menu - which is just about everything.

"My" Veggie Grill doesn't offer the Crostini Italiano, so I was pretty tickled to have the opportunity to sample the recipe at home. It was fast and easy to make - even in my little studio kitchen. Rick and I liked it so much we made it twice. I'll share my variation below!


From Veggie Grill in Hollywood, CA

Crostini Italiano
Serves 4–6

1 package Field Roast Italian Sausage*
2 tablespoons olive oil
½ teaspoon crushed garlic
3 tablespoons chopped chives
Pinch salt
Pinch freshly ground pepper
1 French bread baguette, sliced
1 4-ounce jar of olive tapenade
1 8-ounce container Tofutti cream cheese, at room temperature

* Vegan, available at Whole Foods.

Remove casing from Field Roast Sausage. In a skillet over medium-high heat, warm 2 tablespoons of olive oil. Add the sausage and brown evenly on all sides, for approximately 5 minutes. Remove the sausage from skillet, pat it dry with a paper towel, and let it cool for 5 minutes. Chop it coarsely.

In separate bowl, combine crushed garlic and chives with the salt and pepper and mix thoroughly. Slice the baguette in ½ "-thick rounds. Brown in toaster oven at 375 degrees (or under the broiler) for approximately 2 minutes.

To assemble: Take a toasted baguette round, top with 1 teaspoon of olive tapenade, 1 teaspoon of coarsely chopped sausage, and 1 dollop of vegan cream cheese. Repeat with the remaining slices of 
bread. Serve and enjoy.


Variation:
Follow the same instructions as above for the Field Roast Sausage. Skip the garlic and chives if you want to, and mix in a little fresh or dried oregano or basil.
Lightly oil both sides of the bread slices, and gently toast one side in a large skillet over medium-low heat.
Flip the bread slices and spread each with Tofutti Cream Cheese.
Instead of the tapenade, add a layer of cranberry sauce.
Top with the sausage and garnish with another dollop of cream cheese and a sprinkle of herbs.
We loved the combination of sweet-and-sausagy!


This cookbook is a keeper. Get yours by following the link below, and I'll get paid a little bit. Or get it anywhere you like. Just get it! Thanks HappyCow for this terrific addition to any vegan kitchen. And here's an idea for your next cookbook - how about recipes from all your favorite bloggers? Oh, I know just what to make... :o)


Tuesday, August 19, 2014

Pizza Bruschetta

I'm all about simple edible delights these days. A kitchen as small as mine can feel limiting, and I'll admit to wistfully reminiscing about my big, funky Taos kitchen from time to time. But I would't go back, and I'm excited about my new "project," which is to show you what wonders can come from a tiny kitchen and a few simple tools.

I make a lot of pizza, right? There are so many ways to do it. I hope I never run out of inspirations for this most marvelous of foods. I've already shared two of my favorite with you - the Tortizza, and the Cauliflower Crust Pizza. Now I'll add a new favorite, the Pizza Bruschetta. It's ridiculously easy to make, and only requires one skillet on the stovetop.


Pizza Bruschetta
crusty whole grain bread
fresh mushrooms, sliced
fresh garlic, chopped
pizza (or pasta) sauce
Daiya mozzarella
fresh baby spinach
fresh basil, chopped
olive oil

Cut the bread into nice thick slices - about 3/4 inch or so.
Lightly oil both sides of the bread slices with olive oil. (I use a Misto)
Heat a skillet to medium-high, and quickly cook the mushrooms until they lose some water and start to brown a little bit. Throw in some chopped garlic and let it cook for about a minute.
Place the mushrooms in a bowl, wipe out the skillet if needed, reduce the heat to medium-low.
Let the pan cool down for a few minutes, then gently warm the bread slices in the skillet.
Flip the bread over, and spoon on some sauce, followed by the Daiya, spinach, basil, and mushrooms.
Top with another little sprinkle of Daiya.
Cover the pan and let them cook for a few minutes, until the bottom of the bread is golden brown.
Serve with a dusting of Magic Sprinkles.

Tuesday, August 12, 2014

Better Gluten Free Bread

This one has been a Recipe Box exclusive for a long time, but I'm sharing it with all of you now! I have only made this bread in Taos, at that crazy 7,000 ft. elevation. It worked great as written, but I don't know how it will do at sea level, or anywhere in between. You might have to experiment a bit, and I will too, once the weather cools down some and I can face the oven again.  Enjoy!


I've been making (and eating) bread for days, trying to perfect the vegan, gluten free recipe I posted back in March. It was good, but not good enough. It was also much too complicated and had too many different types of flour in it for me to bother with very often. So I've been tinkering with it, and followed a tip from a reader who suggested using an electric mixer. It worked! And it's worked consistently for four batches in a row. Keep in mind that your oven, elevation (I'm at 7,000 ft here), and even the weather can play big roles in your baking success. You might need to make adjustments. Or you might not!

This is what happens when you use the wrong knife. The inside gets crumbled and mushed.
It still tastes heavenly, but it's not as pretty as it could be, and it can even appear to be under-baked.
See below for a bread knife tip!

Simple Gluten Free Bread
makes 2 loaves

2 cups brown rice flour
2 cups millet flour
2 cups tapioca flour
1/2 cup ground flax seeds
1/4 cup guar gum (or xanthan gum)
1 T salt
1 T baking powder
2 pkg dry yeast
6 cups warm water
1/4 cup maple or agave syrup
1 T apple cider vinegar

Preheat the oven to 350º and oil two loaf pans.
Whisk the dry ingredients, including the yeast, together in a large mixing bowl.
Measure 2 cups of the water, and stir in the maple syrup and vinegar. Pour it into the dry ingredients, then add the remaining 4 cups of water.

Blend with an electric mixer on low speed for about a minute, scraping the sides of the bowl once or twice. Once everything is blended, continue to mix on medium speed for another 2-3 minutes. What you'll have is more of a batter than a dough. You won't be kneading it, but it will begin to thicken a little bit, and to become kind of stretchy and sticky. Don't add more flour!
Divide the batter between the two oiled loaf pans. Smooth the tops with a rubber spatula, then make a shallow slit down the center of each loaf with a sharp knife.
Immediately place the loaves into the preheated oven, where the yeast will quickly begin to activate and the bread will rise without any further help from you.

It's true, no kneading. Be patient and watch the show, but don't open the oven!!!
Bake at 350º for about 1 1/2 hours, or until a toothpick comes out clean from the center. Some days I've had to leave it in for closer to 2 hours.
Remove the loaves from the pans and onto a cooling rack. It's best to let them cool almost completely before slicing, but I know that's asking a lot. Do try to wait at least 15-20 minutes though.

Variation: For cinnamon-raisin bread, add 3 T cinnamon and 1 to 1 1/2 cups raisins to the batter.
 I'm practically in a bread coma from all I've been eating.
It's just ridiculously good, and I have no intention of stopping any time soon.

TIP! A good bread knife is worth it's weight in vegan butter. Hacking through a soft bread with a regular knife will only mash it in the center. I've just bought this nice, inexpensive knife from Amazon and I love it. I can't believe it took me so long to get the right tool for the job! Look at how nicely the raisin bread is sliced.

Like this recipe? There are over 100 more in the Recipe Box!

Tuesday, August 5, 2014

Salad Bar Week

Rick is out of town for the week, so I decided to keep my food super simple while I'm here hanging out with the dogs. Like a lot of people, I don't really like to go to much trouble cooking for just myself. I do, however, like to eat good food that's good for me. Every day. It's been hot in Portland, so turning on the stove or oven aren't appealing. Going out is easy, but not much fun on my own. Smoothies are great for my everyday breakfast, so I don't try to complicate that. I needed a solution to lunch and dinner, and I decided to create my own salad bar.

I spent about an hour prepping vegetables and toppings, and making two dressings. Now I'm set for several days. It can easily take 15-20 minutes to make a single salad, but when you do a bunch of prep ahead of time, all you have to do is arrange what you like in a bowl, and add dressing. Poof! Instant salad! And I don't know about you, but when it's all ready and waiting in the refrigerator, I'm much more likely to actually eat that big salad than to think about it while I grab a bag of chips and a tub of salsa.

I like to use a variety of things so I can make my meals different each time. I use pre-washed baby greens, and sometime cut them up a bit, although it's not necessary. Also chopped, grated, and stashed in the fridge are cabbage, red bell peppers, carrots, mushrooms, olives, and pepperoncini. I even drained and rinsed two cans of beans, and thawed some frozen corn, shelled edamame, and green peas. Other things I'll use as the mood strikes me are some leftover steamed potatoes, raisins, cooked hot peppers, sunflower seeds, and even a few of those tortilla chips. As the week goes on I can replenish favorites as I use them up, or change it up with new ingredients.


I make my own dressings because they're always far better than the store bought kind. I've also drifted away from using oil in my dressings (and almost all my cooking), so this way I know exactly what I'm getting. By making two dressings I can have either one by itself, or mix them for even more variety. I made my own recipe for Cheesy Basil Dressing, as well as a new favorite of mine, created by Jane Esselstyn, called 3-2-1 Dressing. It's ridiculously easy, and also quite versatile. The original recipe is 3 T balsamic vinegar, 2 T prepared mustard of choice, and 1 T maple syrup. Mix it up, pour it on. It's really that simple. This time I used the vinegar "juice" from my jar of pepperoncini, Dijon mustard, and maple syrup, for a nice spicy-zippy dressing. I made a triple batch, and I absolutely love it mixed with a dab of the Cheesy Basil Dressing.


Other possibilities for variation are to add cooked grains to any salad, or wrap the whole shebang up in a whole grain tortilla for a more portable salad. Or make Sushi Spring Rolls filled with salad! I don't get bored eating this way, and sometimes I really like knowing that most of my cooking for the week was done in an hour. I can fuel myself with healthy, satisfying meals, while taking a summer break from the kitchen. I'm on Day 5 as I post this, enjoying every bite, and finding plenty of time to walk the dogs and work on new projects. This might stick even after Rick gets home!


Tuesday, July 29, 2014

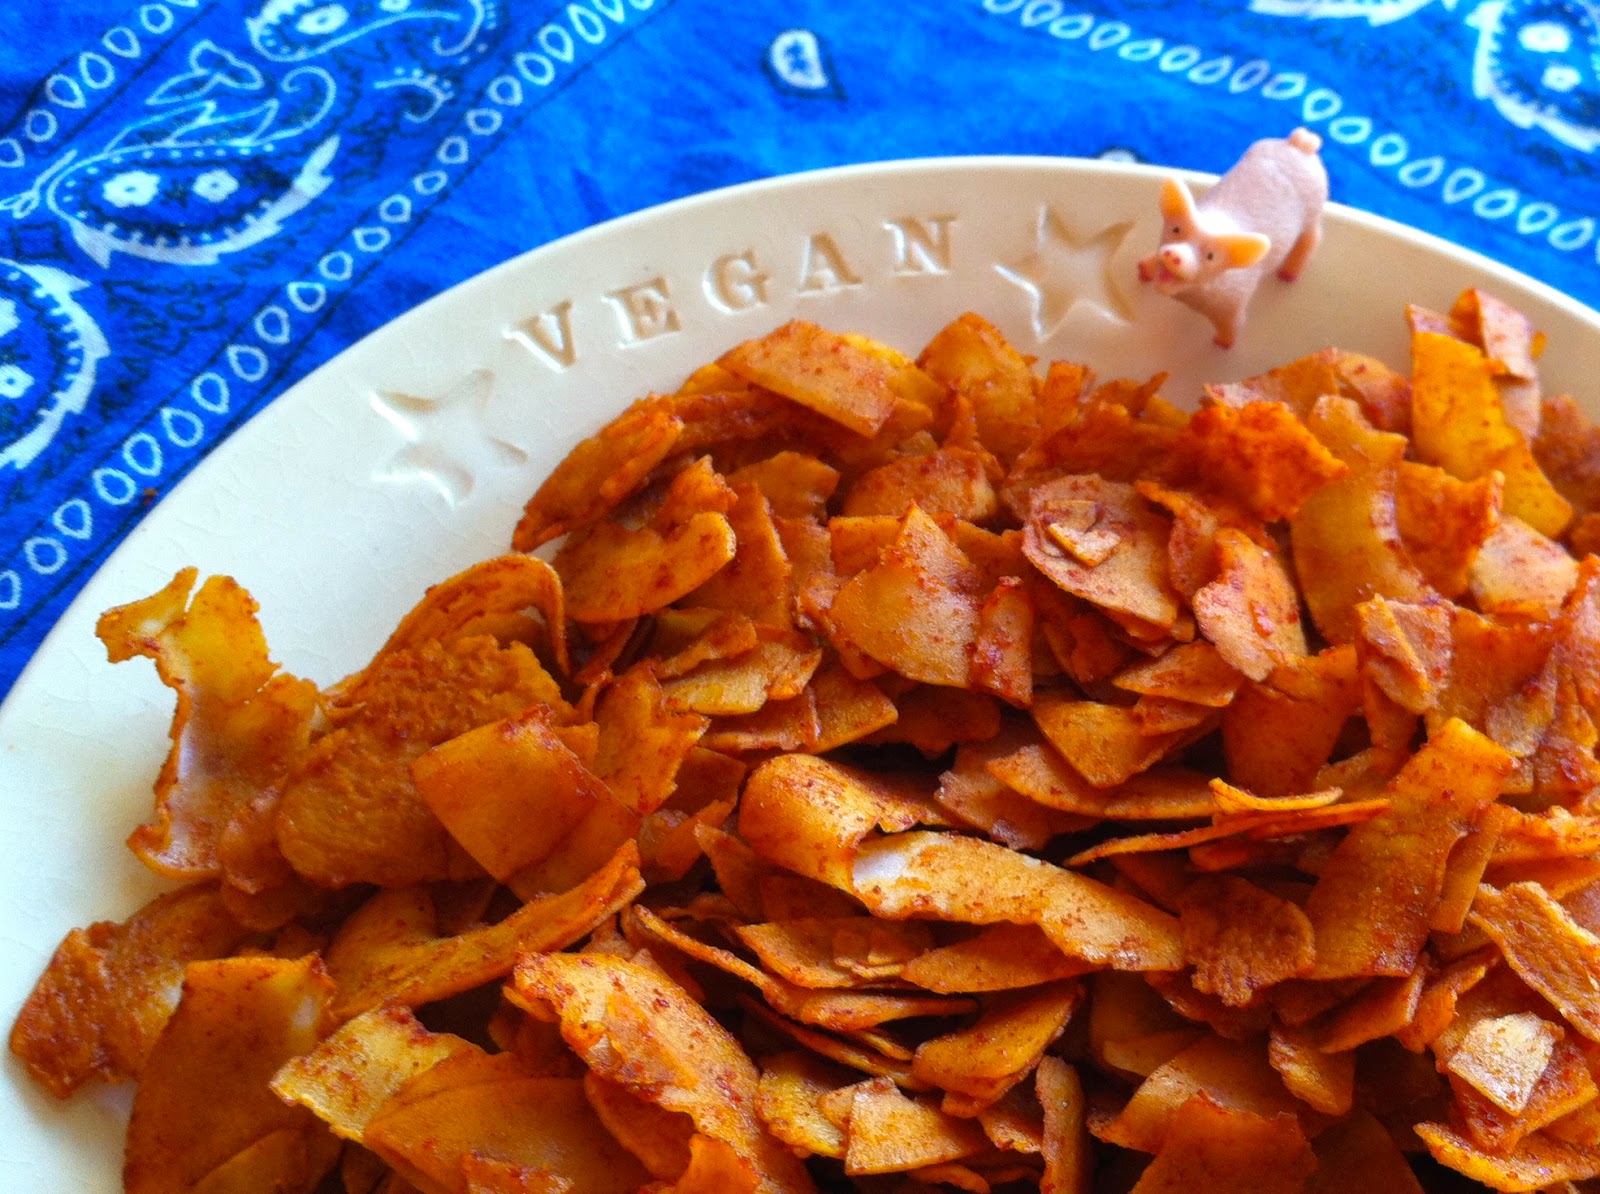
Coconut Bacon Love

You've heard of if, right? Coconut Bacon? It's been around for a while, but I'm usually late to the party, so it only just came into my awareness recently. I immediately went in search of a recipe, and there are many. I also found ready-made coconut bacons which of course are easier, but a lot more expensive than making your own. It's simple enough to make, but I wanted it even simpler than what I found out there, and I didn't want to buy liquid smoke, because I think the name is creepy. Sometimes that's how I decide.

This version is about as easy as it gets, it works in my little kitchen, and takes only four ingredients, all of which I already had - and none of which are liquid smoke. The finished "bacon" is ridiculously good. Use it on sandwiches, salads, cupcakes, whatever. We have a tendency to just sit with a bowl of the stuff and eat it all by itself.

Coconut Bacon
makes about 1 1/2 cups

1 tsp sweet smoked paprika
2 T tamari
1 T maple syrup
1 1/2 cups large unsweetened, untoasted coconut flakes

In a large bowl, mix together the paprika, tamari, and maple syrup.
Stir in the coconut flakes.
Let it all soak up the goodness for about an hour.
Preheat your oven to 250º, and line a baking pan with parchment.
Spread the coconut mixture on the pan and bake for 40-50 minutes, depending on how crunchy you like it, stirring every 10 minutes. It will get crispier as it cools, so no need to overcook it.

Mix it all up and let it soak for an hour.

Spread evenly on parchment lined baking pan.

I made my first batch in a 350º oven, and baked it for only 20 minutes, stirring once half way through. The edges burned but the un-charred bits were quite good. I think it's better to turn the heat down and be patient. It's worth it. I baked this batch in my small oven at 250º for 50 minutes, stirring every 10 minutes. It. Is. Awesome.

No pigs were harmed in the making of this bacon. :o)
Like this recipe? Get over 100 more in the Recipe Box!

Thursday, July 24, 2014

Vegan Jewelry is Finally Here!

I wear my "vegan" necklace all the time. I always get compliments, and always get asked where such a thing can be found. I've been promising to offer them for sale, and now I finally have my silver and tools together in my tiny studio/kitchen, and I'm ready to go! Even though I don't make beads anymore, I still love hammering silver!


These are 3/4 inch sterling silver discs, hand stamped with the word VEGAN. (You can get other words too, like Love, Trust, Joy, Happy... there's a place for that on the order form.) Each disc has a glowing brushed finish, and swings from a fused fine silver ring on an 18 inch stainless steel chain. They're edgy and cool, like Portland... and me! Haha!


Order yours by following this link to my website. Thanks, and enjoy! I hope the neighbors don't complain about the hammering... :o)

Monday, July 21, 2014

Vegan Reuben Bowl

Reuben sandwiches are popular these days, right? Or is it just a Portland thing? I wanted to make something that was sort of a reuben, with a twist, in a bowl. And, I wanted a thousand island dressing for it that didn't contain mayo, even the vegan kind. Here's what I came up with. There was a lot of "num-numming" at the table that night.

Because I have a small kitchen, and a silly little glass top stove that reminds me of a toy, I'm having to rethink the way I cook and the number of pots and pans I use. My recipes from here on will likely be done in a far simpler way than you're used to me cooking. I was the Queen of Using Practically Everything when we lived in Taos. Now I'm becoming the Princess of Simplicity. Maybe this is a good thing.


Reuben Bowl
serves 2

2-4 gold potatoes
2 cups kale or other greens, chopped
1 cup sauerkraut
2 vegan sausages
Cashew Thousand Island Dressing (below)

Wash and cut the potatoes into one inch cubes, cover with water, and put them on the stove to boil.
While the potatoes cook, chop the greens and place them in a large colander.
Add the whole sausages to the boiling potatoes about two minutes before they're done cooking.
When the potatoes are ready, pull out the sausages and cut them into bite sized pieces.
Using the lid to your pot to keep the potatoes in place, pour only the hot water over the greens in the colander to wilt them.
Leave the potatoes in the pot and coarsely mash them by hand, adding a little salt, pepper, and plant-milk if you like.
In wide bowls, arrange layers of potatoes, greens, and sausage bites. Top with sauerkraut and a generous dollop of Cashew Thousand Island. Serve with extra pepper and maybe a little Dijon mustard if you have it.

Cashew Thousand Island Dressing

1/2 cup raw cashews, soaked 20 minutes or more
1/4 cup ketchup
2 T water
2 T rice, white, or apple cider vinegar
1 T + 3 T sweet pickle relish

Drain and rinse the soaked cashews. Place all ingredients, except the 3 T relish, in a blender or food processor and blend on high speed until smooth. Stir in the remaining relish by hand.

Tuesday, July 15, 2014

Exploring the Alberta Arts District

This is a special edition post, requested by RelayRides, as part of their Hidden Gems page on Pinterest. I have to admit that I'd not heard of RelayRides until they contacted me. I'm so glad they did, because I think it's something Rick and I might be able to make use of! It's a peer-to-peer way of sharing cars, and it makes a lot of sense. Whether you own a car and want to rent it to others when you might otherwise just leave it parked, or if you don't own a vehicle, but want to rent one affordably from time to time, this could be a good way to go. We've actually considered selling our car since we moved to Portland, since public transit is so easy and efficient. But now we have another option! With RelayRides we could have our car when we want it, and let it earn its keep when we don't need it. Pretty brilliant plan.

While we're happily going about our urban downtown life in SW Portland, a whole other world is turning on the other side of town, and the other side of the Willamette River, in the NE Alberta Arts District. The fun and funky neighborhood revival that's taken place there over the years has created several blocks of homegrown, shops, and galleries, and of course restaurants - many of them vegan or very vegan-friendly. While Alberta St. is well known by Portlanders, visitors might easily overlook it if they're staying in a different part of town. We're still new in town, but we've made the drive up there several times now, specifically for the food! We'll be going back often to explore the other businesses, and to graze our way from one end of the street to the other.

Every restaurant we've visited in the Alberta neighborhood has been one we want to go back to. The Tin Shed Garden Cafe is a dog and human friendly eatery with a big, covered outdoor patio, complete with a livingroom-style fireplace, lots of water bowls for the pups, an inventive varied menu with lots of vegan options, and even a special dog menu. We loved it, and even though we didn't have our dogs with us, there were at least seven others dining near us, which just seemed like the way it should be.

We really enjoyed the Fungus Among Us - a rich, gooey, toasty portobello sandwich, and the Baby Beluga - a rich bowl of tiny black "beluga" lentils, sweet potato, jasmine rice, fresh spinach, and yellow curry sauce. There were other dishes we will go back for soon, maybe next time with the dogs.


Vita Cafe is destined to become one of our favorites, with many vegan options, and most menu items easily customized. The welcoming atmosphere is enhanced on warm days by large open windows across the front, the service is efficient and friendly, and the food is really good. We popped in for a late breakfast, and sampled the Faux Turkey Florentine and the Country Comfort. Both meals were like a party on a plate. What's not to love about vegan hollandaise or gravy? I mean, really.


The Bye and Bye is a popular vegan bar. Yes, a vegan bar. Who would ever guess? They don't make a big thing of the vegan-ness, but rather let the coolness of the place, along with the goodness of the food and tasty bevs speak for themselves. Going with friends is a good idea, so you can all order something different and share bites. We did just that, and everybody loved everything. It's regular old good food like you might cook at home, only better, and way more fun. Our group had the Chili Pie, Spaghetti, Samurai Bowl, and Grilled Cheese with tomato, avocado, and fresh, hot jalapeños. While the rest of them sipped sodas and beer, I indulged in a great big pink drink, aptly called the Bye and Bye, and served up in a mason jar big enough to swim in. Woo! That was fun!


If you can even think about food at this point, be sure to visit the wonderful Back To Eden Bakery. Everything they offer is vegan, and gluten free, which will make a lot of gluten sensitive non-vegans happy too. They offer lots of delightful looking pastries, as well as lunch, smoothies, and un-dairy ice cream. We only had a couple of cupcakes on our first visit, but we'll absolutely be going back to explore the menu further.


I think you have the idea. Alberta Street is a happening place for anybody interested in good food and a good time. I have a long list of places we need to try, and will want to spend days there just strolling the sidewalks and poking into shops and galleries. The area may not be exactly hidden, but you're sure to find a few gems of your own when you take the time to visit on your next trip to Portland.

~~~
Discover more hidden gems from other bloggers around the world on the RelayRides Pinterest page!


Tuesday, July 8, 2014

Eating Vegan In Portland

I have news! I've been asked to write a new blog called Eating Vegan In Portland, and of course I'm going to do it. My friend, Paul Graham, who writes the popular Eating Vegan In Vegas blog asked me to take his concept to the next level by expanding to Portland. I think soon there will be "Eating Vegan In" blogs from cities all over the world. What an awesome network that will be!

Paul's blog was made into an e-book a while back, and recently came out in print. (Get them at Kobo and Amazon.) With luck, mine will do the same. For now though, it's all about sharing Portland's vegan love. I hope you'll follow along, even if you don't live in Portland, and even if you're not vegan. My goal is to inspire you to dig deep into your own town's garden of plant-based delights. Everybody needs to eat more vegetables, right?


I've added a link to Eating Vegan In Portland (EVIP) in the sidebar to the right, and will update it weekly when I post on Mondays. My regular day to post here at PV will be Tuesday, and you can always easily get from one blog to the other through the links. Better yet, bookmark them! And even better than that, follow them so they're come right to you each week. I'd like that a lot.

My birthday is tomorrow. I will be 57. I can freak out over a number, or I can look at my life and be grateful for all the positive changes that have happened over the past few years. I'm not sure how, but going vegan changed my entire world, starting with my body and health, and branching out to every part of my life. If I hadn't made the plant-based switch, I'm very sure I would not be living in Portland, and I wouldn't be writing Eating Vegan In Portland. Change one thing, change everything... Funny what can come from eating your greens!


Tuesday, July 1, 2014

Lemon-Blueberry Babycakes


Blueberries are all over the farmers markets right now, so I have to share this recipe with you. If you can't get fresh berries, frozen ones work just as well. These little bites of sweet-tart delight are a dense, moist cross between lemon bars and cupcakes. They're vegan of course, and gluten free too. Skip the frosting for less of a sugar jolt. They're terrific either way. The original recipe calls for a new product called the Vegg. I really like the way it works in this recipe, but if you can't find it you can substitute flax meal, as I've done here. The result will not be as yellow in color, but the taste is almost exactly the same. I've made a few changes to suit our personal tastes, but the original recipe for Lemon Bars comes from Lindsay Ray in the Vegg Cookbook. The Vegg/Cookbook Combo Pack is available on VeganCuts.com.


Lemon-Blueberry Babycakes
makes 2 dozen
2 T flax meal
1/2 cup water
1/2 cup sugar
1 cup brown rice flour
1/4 cup tapioca flour
1 tsp baking powder
1/2 tsp salt
1/4 cup coconut oil
1/4 cup almond milk
1 tsp vanilla
zest of 1 lemon
1/4 cup lemon juice (usually about 1 1/2 lemons)
1 cup blueberries
TIP! If making the frosting below, zest one lemon into the cake batter, and the other into a second bowl to save for the frosting.

Preheat oven to 350º
Lightly spray a mini muffin tin with coconut oil.
TIP! Bake the cakes in an oiled tin rather than in little paper cups, and then place the cakes into the cups after they've cooled. That way they still look cute, but half the cake won't stick to the paper when you unwrap them.

Place all ingredients, except blueberries, in a large mixing bowl, and mix with an electric mixer for 2-3 minutes until well blended. Spoon the batter into the oiled mini muffin tin, dividing it evenly between the 24 cups. Scatter a few blueberries on top of each cake. Bake at 350º for 20-25 minutes, until a toothpick comes out clean. Remove the cakes from the pan after 5 minutes, so they don't get soggy. Allow to cool completely before frosting.


Lemon Buttercream Frosting
As a side note, I made this for some non-veg friends recently. When they tasted it, they could only look at me in wonder and say, "This is real frosting!" Well, yes, of course it is!

1 stick Earth Balance
zest of 1 lemon
1 pound powdered sugar
1/8 tsp salt
1 tsp vanilla
almond milk for blending

Place the Earth Balance "butter" unwrapped in a mixing bowl with the lemon zest you made earlier, and let it warm to room temperature. Add salt and vanilla. Mix with an electric mixer until smooth, adding almond milk just a few drops at a time until you have the right consistency. Frost cooled cupcakes and top with a single blueberry.


Like this recipe? There are over 100 more in the Recipe Box!