

easy plant based recipes for anyone who loves good food
Friday, November 30, 2012
PBS Food
Wednesday, November 28, 2012
Ethiopian Soda Bread
I have lots of recipes for Irish Soda Bread, which is usually made with wheat flour. This recipe is my own round-up of the best bits of several recipes, with the unexpected switch to gluten free teff and rice flours, and a nice delicate crunch from the toasted millet. I don't think there's anything at all traditionally Ethiopian about this bread, but because it's made with teff flour, the key ingredient in the wonderful Ethiopian flat bread called injera, this loaf seems more Ethiopian than Irish to me. It's dense and hearty, and great with soups and stews, and best of all, it's quick and easy to make.

You can buy teff flour online and in some stores. I know Bob's Red Mill makes it. I accidentally ordered whole grain teff, but easily ground it to flour in my NutriBullet. An electric coffee grinder would do the trick too. Teff is an ancient North African grain, and the tiniest grain in the world. It's gluten free, and packed with fiber, protein, calcium, and iron.
Ethiopian Soda Bread
Dry Ingredients
1 cup teff flour
1 1/2 cups brown rice flour
1/2 cup millet, toasted over dry heat
1 1/2 tsp baking soda
1/2 tsp salt
Wet Ingredients
1 cup almond milk (or other plant-based milk)
2 T apple cider vinegar
2 T ground flax seeds
Preheat the oven to 425º. Prepare a baking sheet by either oiling it, or lining it with parchment or a non-stick silicone baking sheet.
Toast the millet first, in a dry pan over medium heat, until it starts to brown, and makes little popping sounds.
Mix all dry ingredients together in a large bowl.
Whisk together wet ingredients in a smaller bowl, and let rest about 5 minutes so the flax meal can start to form its gel, which helps to hold the bread together.
Stir the wet ingredients into the dry. The dough will be crumbly when stirred, but should form a moist ball when pressed together with your hands.
Place the dough on a floured board, and divide in half. Form two small round loaves, and cut an X in the top of each, so steam can escape without cracking the top of the bread.
Bake about 15 minutes at 425º, until the outside is nicely browned, and a toothpick comes out clean.
We had this bread with Lentil Stew the other night, and they were wonderful together.
Tuesday, November 27, 2012
A New Look
Yes, you're in the right place! PV has a new look, and a new website too. It was time to expand, and the blog format was too limiting. The blog will stay right here where it's always been, and all the other info, as well as some new things, are on the new website. Please come over and visit the shiny new Positively Vegan Website!
Monday, November 26, 2012
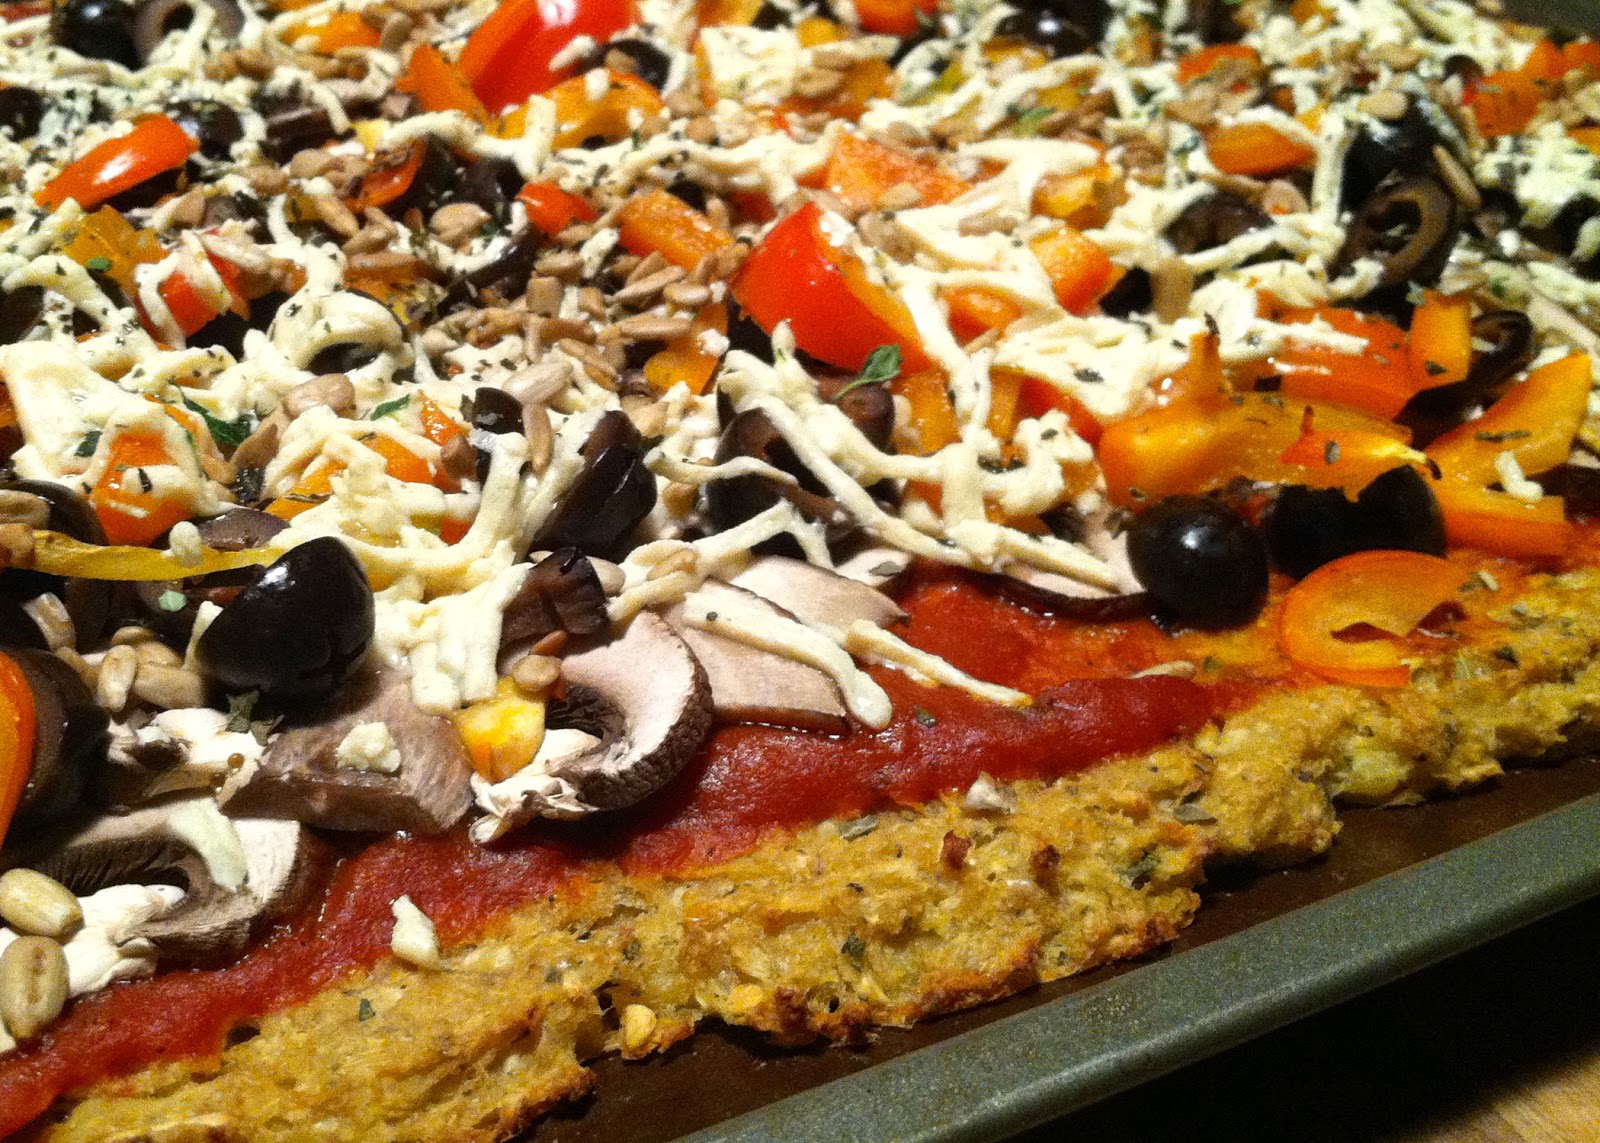
Cauliflower Pizza Crust

How is it I wonder, that I am the very last person on the planet to hear about cauliflower pizza crust? Well okay, maybe not the very last, but still. When my friend Eleanore asked me if I'd tried it yet, I went straight to Google and checked it out, only to find a bazillion recipes for the stuff, and even better, no two recipes quite alike. And as luck would have it, I just happened to have a lonely little cauliflower in the fridge at that very moment, which I was planning to use for dinner, but had no idea what to do with. Wee Ha! Another excuse for a Random Pizza Night!
A little side trip here: Did you know that Rick and I used to own a pizza shop in Seattle? It was called Honeymoon Pizza, and it was wildly popular. I was the Pizza Queen, since I created most of the recipes, and because I was an absolute blur of pizza making speed and efficiency on any given busy Friday night. Amazingly, after eating pizza 6 nights a week for 8 years, we still love pizza, and to this day we'll grab any excuse to try a new version of one of the best foods in the world.
So here's my first crack at cauliflower pizza crust. It was really good. Better than really good. Worth immortalizing just as it is, although I intend to mess with it just a little bit more. Try this out, or wait for the update, which will be coming soon, because we will certainly need another pizza night in the very near future.
Cauliflower Pizza Crust
5T ground flax seed mixed with 1 cup water
about 5 cups grated cauliflower
1/2 cup brown rice flour
1/4 cup nutritional yeast
1T dried basil
1T dried oregano
1 tsp garlic powder
1/2 tsp red pepper flakes
1 tsp salt
Preheat the oven to 425º, and prepare a baking sheet either with oil, parchment, or a non-stick baking liner.
Mix the flax seed and water first, and let that sit for about 15 minutes while you play with the cauliflower. Grate the cauliflower by hand, or better yet, in a food processor with a grater blade, which handles the job in no time, and spares your delicate knuckles too. Once the cauliflower is grated, heat it in a dry skillet for about 5 minutes to remove some of the moisture, and to begin the cooking process. You should notice that the smell of the cauliflower changes from sort of "skunky" to a more mellow mashed potato-y aroma.

Mix the cauliflower, flax/water, and all other ingredients in a large bowl, and adjust the seasonings to your liking.

Spread the batter evenly on the prepared baking sheet, making the edges a little bit thicker than the center. Bake the crust for about 30 minutes, until it browns and firms up, and the edges start to crisp.


Remove crust from the oven and add you sauce, toppings, and cheese. I used sauce from a jar, mushrooms, red bell peppers, black olives, tamari sunflower seeds, half a bag of Daiya mozzarella, and a sprinkle of herbs.

Bake 10 minutes more, then cut it up and dig in. This makes kind of a soft crust, and all but the edges are most easily eaten with a fork. My mission on the next run through is to make it less moist, and more sturdy and crispy. I think I know just what to do. Meanwhile, there's nothing wrong with this version. The flavor is amazing, and three of us ate up this whole big pie in one sitting. Yep, we still love pizza.
~~~
Update - 11-27-12
I made this again last night, with a few small changes, and it was perfect! Here's what I did:
1. Mix the ground flax seeds with only 1/2 cup of water.
2. Use corn flour instead of rice flour.
3. Make small round pizzas instead of one big pan full. Ours were about 6 inches, and they were pick-up-able and crispy-chewy. Just delish!
Friday, November 23, 2012
Thanksgiving Critique
I cooked all day yesterday. Wouldn't have it any other way. So here, as promised, is the full menu, along with recipes... and opinions. It was sort of an informal Thanksgiving for us, so that left room to experiment, with some success, and some not-so-much-success.


We started with breakfast at our daughter's place. I made cinnamon rolls, chilaquiles, and red chile to take over with us, and we ate (very informally) in front of her big TV and the Macy's Parade. That's my idea of a perfect Thanksgiving morning. The cinnamon rolls were just what I'd hoped for - sweet and sticky and decadent, and something I would only make for special occasions. The recipe comes from Whipped, and it looked so good to me, I only changed two things. I added chopped walnuts to the filling, and then added orange zest and a little Grand Marnier to the glaze. I poured the glaze over the rolls when they were hot from the oven (I was in a hurry to get to the parade.) The result was that the glaze soaked into the rolls, which at first I thought was a mistake, but not so. The orange drenched rolls became more like sticky buns, and we all loved them. The chilaquiles with red chile remain a family favorite around here, and even though there's plenty of room for variations, we love them no matter what. I totally forgot to take pictures of breakfast. Sorry. There are pics on the links to the recipes though.
Dinner was a mixed bag. We had a lovely Shepherd's Pie, which I sort of invented as I went along, with good results. Rick even requested that we make shepherd's pie our official and forever Thanksgiving dinner. I loosely followed my own recipe, posted some time ago, but simplified it quite a bit.

Shepherd's Pie
Pre-cook a cup of lentils, or buy a can of cooked lentils.
Make some mashed potatoes, any way you like to make them, and set them aside to use as the top layer of the pie.
Sautee a chopped onion with 2 or 3 cloves of chopped garlic.
Add 2 or 3 chopped carrots and a pound or more of chunky-chopped mushrooms. Cook 2-3 minutes.
Add the lentils, some frozen peas, and some chopped kale or spinach, and stir in till the greens are just wilted.
Stir about 1/4 cup of rice flour into a cup or so of veggie broth, along with some tamari, salt and pepper, thyme, and sage.
Pour the flour mixture into the pan, and add more broth, stirring to make a generous amount of gravy.
Add 1/4 cup nutritional yeast, and adjust seasonings to your liking.
If you're using a cast iron skillet, just layer the mashed potatoes on top of everything else, and bake it at 350º for about 45 minutes, or until the potatoes begin to brown. If you don't have cast iron, transfer the pie filling to a lightly oiled baking dish, top with potatoes, and bake.
This was excellent served with fresh cranberries, which I cooked up with some orange juice, orange zest, and just a little bit of sugar. It all just tasted like Thanksgiving.
I took the idea for our salad recipe from the book Vegan Holiday Kitchen, by Nava Atlas. Her Sweet-Potato-Poppy Seed Coleslaw sound interesting, so I took her suggestion to use purple cabbage and gated raw sweet potato as a start. I added some lightly steamed Brussels sprouts, golden raisins, and toasted pumpkin seeds, along with a slightly sweet, slightly vinegar-y cashew cream dressing. At first taste we all loved it, but I didn't think it held up well with subsequent bites. Raw sweet potato might be an acquired taste. I found it to be too starchy and weirdly textured, and I suspect it was, um, a little bit difficult to digest. I wish I'd gone with grated carrots instead, or even just a regular green salad. It was pretty though, wasn't it?


We had two desserts, which I made early in the day, just to be sure I had the energy to get them done. The Apple, Pear, and Cranberry Crumble, also from Vegan Holiday Kitchen, was delicious, and more than made up for the weird salad recipe. Find the original recipe on page 53 of the book, or try it my way here, with a few small changes.

Pear-Apple-Cranberry Crumble
Filling
1 cup fresh cranberries
3 or 4 pears
2 large apples
1/2 cup maple syrup
1 tsp cinnamon
1/4 tsp nutmeg
1 tsp vanilla
Topping
1/2 cup whole wheat flour
1/4 cup ground flax seeds
1/2 cup chopped walnuts
1/4 cup sugar
1/2 tsp cinnamon
2 T melted vegan butter
Coarsely chop the cranberries.
Core and slice the pears and apples.
Mix the fruit with all other filling ingredients in a large bowl.
Mix the topping ingredients, except for the butter, together in a smaller bowl.
Stir in the melted butter until the topping is well mixed and crumbly.
Pour the filling into a 10x10 baking dish, and sprinkle the topping evenly over the top.
Bake at 350º for about 45 minutes, or until the top starts to brown and the filling is bubbly around the edges.
The second dessert was my attempt to offer something like pumpkin pie, but with less effort. I had seen the recipe for Pumpkin Pie Squares (yes, I know mine is round) online the day before, and it seemed like just the thing. Easy to make, healthy, and pumpkin-y, and with lots of glowing comments from folks who had tried it. What could go wrong, right?

It was easy to make, and looked really pretty. We loaded up our dessert plates, and settled in by the fire to stuff ourselves just a little bit more. I took a bite, and thought, huh... Maybe another bite was needed to appreciate this treat. After a second taste test I looked up at everyone else, and sort of ungraciously said, This pumpkin thing is awful! One by one they all timidly agreed, not wanting to hurt my feelings, but hey, it's not my recipe. The texture was weird and gritty, it was bland and not even a little bit sweet, and it tasted nothing at all like pumpkin pie. Maybe the recipe could be salvaged with a lot more sugar and spice, but I don't think I'll bother. The dogs like it, so it won't go to waste, and at least we had the good fruit crumble. I owe Rick a real pumpkin pie, for sure though. (I'm not posting a link to the Awful Recipe. That would be mean. But if you want it for some reason, email me and I'll send it to you.)
I hope you had a happy and tasty Thanksgiving, with lots of good leftovers to hold you through the weekend. Next week, look for new recipes here. Time to start thinking about Christmas dinner. But first, a little rest...

Wednesday, November 21, 2012
Happy Thanksgiving
This is my adopted turkey, Elizabeth. She's so beautiful, and I sort of wish she could actually come and live with us, but that would be a bad idea, because our dog Lucy would think we had brought her a big fluffy snack. But for a mere $30, you too can adopt a turkey from Farm Sanctuary, which really means you sponsor a bird, and help to cover the costs for someone else to care for it. Everybody wins, especially the turkeys. I'm going to print this picture, and have Elizabeth sit at our Thanksgiving table with us. Really.

I'm planning a small and simple Thanksgiving Feast this year. There will likely be only three or four of us at the table, and I just can't work up the enthusiasm to go all out this time around. Christmas will be a big family event, with out of town guests and lots of festivity. I'm saving my energy for that.
But that doesn't mean we won't be having a wonderful meal on Thanksgiving. In fact, we'll have two wonderful meals. Rick and I don't have TV service in our house (on purpose), but I love watching the Macy's Parade every year. So, we're going over to our daughter's place, breakfast in tow, to watch it on her TV. I'll make chilaquiles, red chile, and maybe some cinnamon rolls. We'll also take some soy nog to splash in our tea, because in my world, Egg Nog Season officially begins on Thanksgiving (as does Christmas Music Season, but I know many people are sensitive to that, so I'll leave it for now), and a bottle of champagne and some orange juice for mimosas. To be honest, the parade is really more like background for our BreakFeast, but it's an important component, so I'm glad we can do it this way. Last year we tried streaming it online, which meant hopping between several live-but-achingly-slow street cams to see what we could see. No sound, no motion, no commentary. It was sort of dismal and required way too many mimosas to make it even sort of fun.
So after BreakFeast, back home, with no TV so no football (yay), we can relax, read, play a game, go for a walk, nap, and prepare the next meal. Dinner is scheduled to be some sort of shepherd's pie, which I haven't completely invented yet, along with fresh cranberries, because I require them, some kind of salad or side veggie, and sweet potato biscuits. Simple, but still special, and not days and days of work to pull it all together. And for dessert, an apple-pear crisp.
I like a Thanksgiving with some wiggle room. It leaves space for spontaneity and surprises, and I think it will be just a darling little day. Of course I will share more recipes after the fact, but for now, if you need help planning your own feast, I'll advise you to wander the internet a bit. You won't have to go far to be hit over the head with dozens of recipes for all things Thanksgiving. I hope you have a lovely, loving time with family and friends, and I hope the turkey at your table is a portrait of one you've adopted. Happy Thanksgiving!
Monday, November 19, 2012
Lentil Stew
Sometimes it's fun to skip a trip to the store, and just go through the fridge to see what wants to be made into dinner. This warming pot-full of goodness was inspired by a bag of regular old green lentils and a few stray vegetables that needed to be used. As with most stews, feel free to use whatever you have on hand. The ingredients and quantities here are only suggestions, and while the surprising Secret Ingredient in this is sesame tahini, if you don't happen to have any, don't make a special trip to the market. Your stew will still be good without it.

Lentil Stew
1 yellow onion, chopped
2 cups lentils
2 - 3 cups potatoes, chopped
4 cups vegetable broth
1 - 2 carrots, chopped
1 zucchini, grated
1 bunch chard, chopped fine
1/4 - 1/2 cup sesame tahini
Seasonings - fresh thyme, cumin, tamari, and salt and pepper - all to taste
Sort and rinse the lentils, cover with water in your soup pot, and boil them for about 3 minutes. Drain and rinse the lentils, and set them aside for a few minutes. This step cleans them really well, reducing the foam that comes with cooking lentils, and also reducing the gas that comes from eating them.
Steam-fry the onion in a little water for about 3 minutes, until it begins to soften.
Add the broth, lentils, and potatoes. Bring to a boil and cook for about 20 minutes, until the potatoes are cooked but still firm. Add water if necessary to keep everything covered.
Add the carrot and zucchini, and continue to cook until the carrots are softened but still have a bit of crunch to them.
Add the chard and cook about 5 minutes.
Check to be sure the lentils are done, then add the tahini and seasonings, and more water if you like.
Serve with any favorite bread. We had a nice homemade Ethiopian Soda Bread.
Friday, November 16, 2012
Oil-Free Hummus
How is it, that after over a year here with this blog, I have not posted a recipe for hummus? Maybe it's such a vegan staple I assumed everyone already knew how to make it. Not so, right? Some people look at me like I'm loco when I suggest that hummus doesn't only come from little plastic containers in the store. Yes, we certainly can make our own, and it's so much better and cheaper and healthier.

I've used lots of hummus recipes in the last few years, and this one is my own favorite version, which contains no added oil. Yes, there is fat in it, from the tahini, but because it comes from a whole food source (sesame seeds), it's ever so much better for you than extracted olive oil, which is 100% pure fat and really nothing else. Try this recipe as it stands, and if you really feel it needs to be richer, go ahead and add some olive oil.
Oil-Free Hummus
2 cans garbanzo beans, drained and rinsed
2-3 cloves garlic
juice of 1 lemon (or 2 if you like really lemony hummus)
1/2 cup sesame tahini
2 T nutritional yeast
1 tsp cumin
1 tsp paprika
1/2 - 1 tsp red pepper flakes
1/2 tsp salt
2 T tamari
1/2 - 1 cup water
Blend all ingredients on high speed in a food processor, adding the water gradually, until the hummus is smooth and as thick or thin as you prefer it. Serve as a dip with vegetables, chips, crackers, or pita bread, or use it as a spread in wraps and sandwiches.
Variations - Create your own unique hummus flavors by experimenting with fresh herbs, olives, roasted garlic, or other roasted vegetables.
Wednesday, November 14, 2012
Roasted Red Pepper Bisque
A "bisque" is traditionally a creamy seafood soup, but these days you'll see the term used for any creamy soup, whether or not it contains crustaceans. This lovely-hot-creamy-soupy-bisquey delight came to me in sort of a waking dream, and demanded that I make it right away. I obeyed, and all present were well rewarded.

Roasted Red Pepper Bisque
Makes 4 big bowls
4 large red bell peppers
1 onion, chopped
2 stalks celery, chopped
2 T olive oil
2 T Earth Balance "butter"
1/2 cup fresh basil, packed
1 box (32 oz.) almond milk
1/2 cup raw cashews, soaked for 20 minutes or more, and drained
1 tsp garlic powder
1/4 - 1/2 tsp red pepper flakes
1 tsp salt
1/4 tsp white pepper
1/4 tsp sweet smoked paprika
3 T tamari
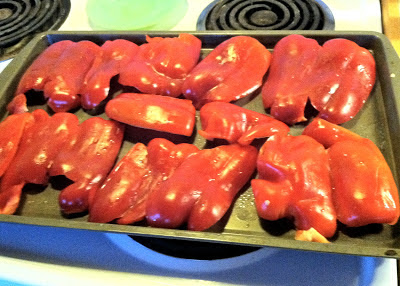
Cut the bell peppers in half lengthwise, tear off the stems, and clean out the seeds. Place on an oiled cookie sheet, skin side up, and flatten with your hand. Broil the peppers until the skins turn black. Quickly place the blackened peppers in a paper bag, or a bowl, and cover tightly so the peppers can steam. After about 15 minutes, remove the blackened skins from the peppers, and chop them coarsely.


Heat the oil and butter in a soup pot over medium heat, and add the onions and celery. Cook until the onions begin to soften and look translucent - about 5 minutes.
Stir in the roasted peppers, then add all other ingredients.
Pour the soup into your blender - in two or more batches if necessary - and blend at high speed until smooth. Return to the soup pot and heat to steaming. Adjust seasonings and serve with a drizzle of Pesto Cream and a sprinkle of toasted pine nuts.
Pesto Cream
1/2 cup raw cashews, soaked for 20 minutes or more, and drained
1 cup fresh basil, packed
1/4 cup pine nuts, lightly toasted in a dry pan
1 large clove fresh garlic
2 T nutritional yeast
1/2 tsp salt
1/2 cup water
Place all ingredients in your blender or food processor, and blend on high speed until very smooth. Pour into a plastic squirt bottle, and drizzle over the finished bisque.


Roasted Red Pepper Bisque
Makes 4 big bowls
4 large red bell peppers
1 onion, chopped
2 stalks celery, chopped
2 T olive oil
2 T Earth Balance "butter"
1/2 cup fresh basil, packed
1 box (32 oz.) almond milk
1/2 cup raw cashews, soaked for 20 minutes or more, and drained
1 tsp garlic powder
1/4 - 1/2 tsp red pepper flakes
1 tsp salt
1/4 tsp white pepper
1/4 tsp sweet smoked paprika
3 T tamari
Cut the bell peppers in half lengthwise, tear off the stems, and clean out the seeds. Place on an oiled cookie sheet, skin side up, and flatten with your hand. Broil the peppers until the skins turn black. Quickly place the blackened peppers in a paper bag, or a bowl, and cover tightly so the peppers can steam. After about 15 minutes, remove the blackened skins from the peppers, and chop them coarsely.


Heat the oil and butter in a soup pot over medium heat, and add the onions and celery. Cook until the onions begin to soften and look translucent - about 5 minutes.
Stir in the roasted peppers, then add all other ingredients.
Pour the soup into your blender - in two or more batches if necessary - and blend at high speed until smooth. Return to the soup pot and heat to steaming. Adjust seasonings and serve with a drizzle of Pesto Cream and a sprinkle of toasted pine nuts.
Pesto Cream
1/2 cup raw cashews, soaked for 20 minutes or more, and drained
1 cup fresh basil, packed
1/4 cup pine nuts, lightly toasted in a dry pan
1 large clove fresh garlic
2 T nutritional yeast
1/2 tsp salt
1/2 cup water
Place all ingredients in your blender or food processor, and blend on high speed until very smooth. Pour into a plastic squirt bottle, and drizzle over the finished bisque.

Monday, November 12, 2012
Frito Pie
I have to admit, Frito Pie is a pretty brilliant idea. Corn chips and chili, with assorted toppings just make for a friendly little meal in my book. Besides, it's a great way to use up the last of that giant vat of 3 Bean Chili you made last week. I know Frito Pie is a popular dish in the south and southwestern parts of this country, but I'd never heard of it until we moved to Taos. Most of the Frito Pies we see around here are awful little things, made from canned chili, and served in styrofoam bowls for $1 at church bazaars and car washes. I've even heard of the "walking taco," which is actually made inside a mini bag of Fritos. Oh, Dear Holy Mother of Good Things to Eat, save us from these culinary atrocities. Amen. Here is the answer to my prayer...


Good For You Frito Pie
lettuce, chopped
corn chips
chili
vegan cheese (I like Daiya Pepperjack shreds)
tomatoes, diced
avocado, chopped
red onion, chopped
vegan sour cream
hot sauce
This is a good dish to have prepped for a crowd, and then let everybody make their own. Warm up the chili, and layer all ingredients in a bowl, or on a plate, in the order given, or in any old order that pleases you. This is a very flexible recipe. Omit anything you don't have or don't care for - in my case, raw onions. You won't find anything out there this good for a buck!
Note - While Fritos are the traditional corn chip used in Frito Pie, we steer clear of them because when corn products are not organic, chances are they're made with genetically modified corn. Given the choice, we prefer to go with Trader Joe's Organic Corn Chip Dippers. They taste amazingly like "real" Fritos, and they're more on the healthy end of the snack chip spectrum. You can also use any kind of organic corn tortilla chip you like.

Saturday, November 10, 2012
Positively Vegan Recipes - Volume 1 is Here!
I've not been happy with the ever-expanding list of recipes I've been trying to keep up for you on the Recipe Box page all this time. It's too much work, and it's hard to navigate. So I chucked it! I found a great little program that turns blogs into digital file books, so I rounded up most of my favorite recipe posts from September 2011, when I started the blog, through October of 2012. If you find it useful, I'll do another one next year!
Since the entire thing is an experiment, the pricing is too. For the first week or so, maybe longer, I'm offering the book by donation. You choose your price! That way everyone can afford it, I'll get some idea of what such a thing is worth to you, and I can decide whether to do other digital books and how to price them.
Click on the PV Recipe Book tab to order yours. You'll be taken to a link to the PDF, which downloads in just a few minutes. Once it's on your computer, you can save it and scroll through it there any time you like, or print it out to keep handy in the kitchen. I hope you like it. Please let me know what you think!

Friday, November 9, 2012
Good Morning Miso

When it's cold and stormy outside, sometimes a frozen fruit smoothie just isn't appealing. I find that my tastes change with the seasons, and in winter, I like a nice hot breakfast. This mean, green, hot "smoothie" is really more of a soup because it's heated after blending. It's full of good greens and soothing miso, and it's equally tasty from a mug or a bowl on a frosty morning.
Miso soup is a nice, gentle waker-upper for your digestive system, and although we tend to eat it for lunch and dinner in the US, in Japan it's considered more of a breakfast food.
I make ours in a NutriBullet, but you could use any kind of blender you have. It's not recommended to blend hot liquids in a the "Bullet," so I make it cold and then heat it in a sauce pan. Blend it hot in your own blender if it can handle hot soups.

Good Morning Miso
2-3 large kale leaves, torn up
2 T miso paste (I like the lighter types for this)
1-2 T wakame (seaweed)
1 carrot, chopped so your blender can handle it
2 T tamari
pinch red pepper flakes
1/4 tsp garlic powder
1-2 T fresh ginger, chopped coarsely for the blender
2 cups cold water
Place all ingredients in the blender, and blend on high speed for about 1 minute, or until smooth. Adjust the seasonings to your liking, and then heat to a steamy simmer over medium heat. Never boil miso, or you'll destroy the healthy enzymes. I'm not sure, but it seems to turn even more of a gorgeous bright green color as it heats up.

We like to sip our morning soup-smoothie from a mug, with our favorite Avocado English Muffin on the side. It a great way to start your day. Cheers!
Wednesday, November 7, 2012
3 Bean Chili
Unlike my Red Chile recipe, which is a sauce, this is the kind of chile-with-an-i that pretty much came out of a can when I was a kid. Rich, thick, and beany, and totally non-carne, it's well worth the bit of extra effort it takes to make it yourself. While chili is not exactly a soup, it's kind of in the soup family, like a cousin maybe, and it's another big bowl of comfort that's easy to throw together on a chilly night... pun intended. I've been tweaking this recipe for years, and I'm really happy with it now. My two special secrets for this are to roast the spices in the beginning, and to add the beer instead of water or more broth. Both lend a lot of depth to the flavor of the finished chili.

3 Bean Chili
1/2 cup chili powder (I use part mild, and part medium, so I don't hurt anybody with the spice. You can always add more heat to the bowl later with hot sauce or red pepper flakes.)
1/4 cup cumin
1/2 tsp cinnamon
1 tsp garlic powder
1 beer
1 large onion, chopped
1/2 cup organic corn flour
4 cups vegetable broth (1 - 32 oz. box)
3 cans diced tomatoes with their juice
2 cans kidney beans, drained and rinsed
2 cans black beans, drained and rinsed
2 cans pinto beans, drained and rinsed
1/4 cup nutritional yeast
3 T tamari
1 tsp salt, or to taste
2 cups frozen corn
In a large pot, dry-roast the chili powder, cumin, cinnamon, and garlic powder over medium heat, stirring constantly for about 2-3 minutes, being careful not to burn the spices.
Add the beer and onion, and cook over medium heat until the onion starts to soften - about 5 minutes.
Add the corn flour gradually, stirring constantly. It will form a thick paste.
Gradually stir in the broth, then add the tomatoes, beans, tamari, salt, and nutritional yeast.
Bring to a simmer, and cook for 10-15 minutes, stirring often, to blend the flavors.
Add the corn 5-10 minutes before serving.
Serve with a topping of vegan cheese or sour cream if you like, and cornbread, or any other bread you prefer.
Variations - Serve chili over rice or quinoa. Add crumbled tofu or Boca Burger along with the onion, for a more "con carne" texture. Add more vegetables, such as zucchini, carrots, or greens.
Monday, November 5, 2012
Smoky Bean Soup
A week with no blogging events feels a little empty after October's crazy-busy activity, but at least we have Meatless Monday. I'm going to be leaning more heavily into soups for a while. As the weather gets colder, and the days get shorter (or at least feel that way), there's nothing better than a comforting bowl of soup by the fire, is there?
This soup comes together pretty quickly. I sort of invented it the other night after getting home from a movie and wanting some good, simple, real (not movie snacks) food. It has some nice layers of flavor, a little spice, and a nice smokiness that might remind you of bacon. We liked it so much for dinner, we had some of the leftovers for breakfast the next morning. That's another great thing about soup - a big pot full can last for days.
"Always start with a larger pot than you think you'll need."
~Julia Child~

Smoky Bean Soup
1 onion, chopped
2 stalks celery, chopped
4-6 cloves garlic, chopped
1-2 cups cremini mushrooms, chopped
2-3 tsp fresh thyme, chopped
2-3 T fresh basil, chopped
4 cups vegetable broth (1 - 32 oz. box)
1 can diced tomatoes with their juice
2 cans cannellini or great northern beans, drained and rinsed
1/4 cup nutritional yeast
2 T miso paste, mixed with a little water
2 T tamari
1 tsp salt
fresh ground black pepper to taste
1/2 tsp red pepper flakes
1/2 tsp sweet smoked paprika
4 cups fresh kale, chopped
Cover the bottom of your soup pot with water. Bring it to a boil over medium-high heat, and toss in the onion, celery, and garlic. Steam-fry 2-3 minutes.
Add the mushrooms, thyme, and basil, and cook 2-3 minutes more.
Add all remaining ingredients, except the kale, and bring to a near-boil. Always be careful not to boil miso, as it will kill the enzymes.
Add the kale and cook over medium-low heat until the greens are wilted but still bright green, about 5-10 minutes.
Serve with crusty bread and a glass of wine by the fire.
Variations - Use spinach instead of kale. Try different types of beans. Add more vegetables, such as zucchini, carrots, and red bell peppers. Add some pasta, for an even heartier soup.
Friday, November 2, 2012
Little George
I found a George Foreman Lean Mean Fat Reducing Grilling Machine in my Dad's kitchen, and since he doesn't cook - at all - he told me to take it home with me. Dandy. I've been wishing for a nice heavy (expensive) panini press, but really don't have room for one in my own humble kitchen, and can't justify the expense just to make a sandwich for lunch now and then. I though this little grill might suffice, and it does, sort of.

It's small, actually tiny and sort of adorable, with it's purple plastic bun warmer top. Small is good when you have a small kitchen and ever diminishing storage space. It won't cook a lot of food at one time, like only maybe three garden burgers at most, but for only one or two people, that's plenty. And it's all non-stick, which means you don't need to use a lot of oil.

On the less positive side, it doesn't get very hot, and has no temperature control. I spent most of the afternoon grilling one onion, one eggplant, one bell pepper, three small zucchinis, and three portobello mushrooms. The upside of the slowness is you can get distracted for quite a while without worrying about burning your food. I get distracted a lot, especially when I have helpers in the kitchen.
The other thing I don't care for is the slant of the grill. It's tilted to allow excess grease, presumably from cooked meat, drain off into little tray. But grilling vegetables don't need this feature, and tend to slide off before I can close the lid, so I remedied the slant by propping the front legs on a cutting board. Problem solved.

Eventually we had a nice plate full of grilled veggies, which we used as toppings on our tortilla pizzas. Deeeeelicious. And there was enough left over to make some nice panini sandwiches the next night. I used "Little George," as I already so fondly call him, as well as my grill pan with a cast iron press. The difference was minimal. Both sandwiches cooked beautifully, although the one on the stove cooked a little bit faster, since I had control over the temperature. Used as a panini press, Little George toasts bread and melts vegan cheese much faster than it grills a slice of eggplant. I think that's because of the thickness of the sandwich, which allows both the top and the bottom of the grill to come into good contact with the food. On the second round, I also found that vegetables sliced a half inch thick, or slightly thicker, cooked better than the thinner slices.

Bottom line is, grilled vegetables are wonderful. Make some. Use them in everything from salads to sandwiches to pizzas to casseroles. How you grill them doesn't matter as much as finding a method, and possibly a machine, that suits you. I think I'm fine for now with keeping it simple. The big panini press can wait. But Little George is a welcome addition to my growing fleet of Small Kitchen Appliances.
Subscribe to:
Posts (Atom)